
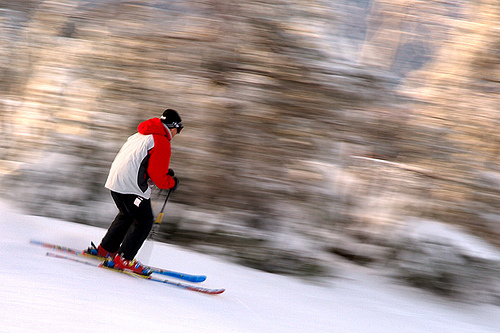
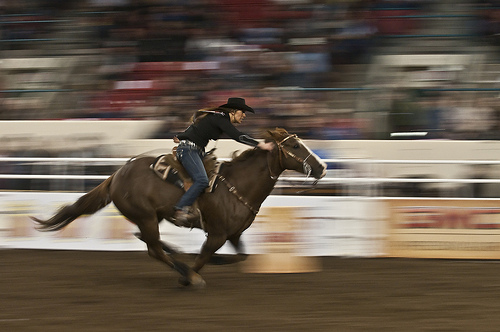
In photography, panning refers to moving the camera horizontally. With a bit of practice, you can achieve some amazing results. For example, the subject of the photo might be crisp and still, but the background is blurred with motion lines.
Photo thanks to Chaval Brasil
I must admit, this isn’t the most easiest photography technique to master. However, it’s a fun one to do and requires a bit of patience, energy and lots of trial and errors.
This post was suggested by one of our Photoble readers Dahuang, who has been curious over panning in photography. If you have a suggestion, please let us know on our blog or our Facebook page. We read and do our best to respond to all comments. 🙂
1.) Choose a moving subject
For this project, it’s probably best to head outside as you’d have a wider selection of moving subjects. Best to start off choosing a subject that’s moving at a slower pace and in a straight line, like someone strolling or a car slowing down at an intersection. Once you get the hang of panning, you can choose faster subjects like moving cars, bike riders, running dogs or even roller coasters.
2.) Designate a Shoot Point
Choose a landmark or an object so that when your subject passes this point, it’s when you would hold down the shutter to shoot. The point could be a tree, pole, shop window or a marking on the road.
3.) Set the Shutter Speed
Before you start shooting, set the shutter to a slower speed like 1/30 or 1/60 so that there would be motion blurs. Play around with it as you might find yourself adjusting the shutter speed even slower. Nevertheless, on the slower end (e.g., 1/8) you will find your subject being slightly blurred too.
Have your camera mode on Tv (shutter priority). Don’t worry too much about the aperture as the background would be blurred anyways.
4.) Focus Tracking
It’s very important that your subject is in focus. You might like to switch focus to AI Servo mode (in Canons) or AF-C mode (in Nikons). In this mode, hold down your shutter half way to lock focus on your subject. Without letting go of the shutter, start following your subject with your camera at the same speed. Your camera would automatically adjust focus.
5.) Shoot!
When your subject passes your designated shoot point, fully press down on the shutter while still following the subject. For smoother horizontal movement and clearer focused subject, use a tripod on level ground. Your main subject might never be super focused and clear, but panning is about creating that contrast. Your subject will be focused relative to the blurred background.
Photo thanks to Scott Ableman

Photo thanks to blentley
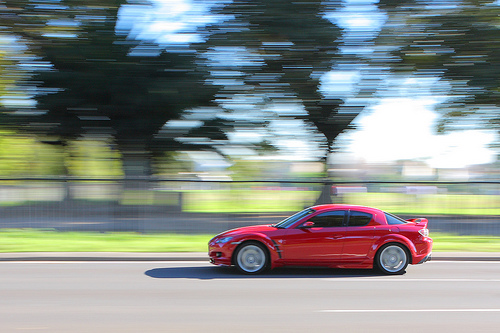
Photo thanks to zoutedrop
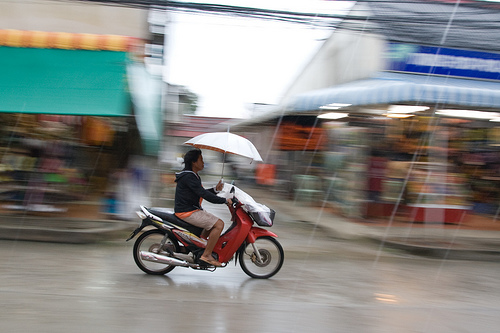
Photo thanks to raindog

Photo thanks to Ed Yourdon
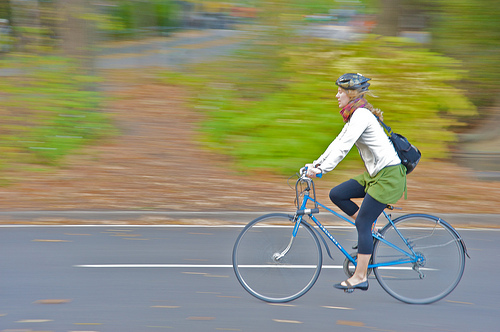
Photo thanks to __Olga__

Photo thanks to gibbyson4
Do you have any examples to show us? Or have another tip to add? Comment below! If you liked this post, you might also like our inspiration post on motion blur.


Pingback: Internet Safety eBook