Guest post by: Brad Nichol from 01imaging.com
This is the first instalment in a three part series I am presenting on the theme of how to get the most out of your iPhone photos. In this instalment we will concentrate on the characteristics of the iPhone 3GS image quality with a view as to how we may both work creatively with those characteristics and work around them when needed.
Frankly as a camera the iPhone has some pretty serious flaws, which is fair enough, it was after all designed to be a phone first and foremost. Some of its flaws are unique to the iPhone but most are just typical of the phone camera breed. None of the flaws will prevent you from taking terrific images with your iPhone! If your image is strong enough it probably matters little what is used for the capture and it is possible that the flaws can be turned into assets if you know what you are doing.
So let’s pull the iPhone image quality apart and see how it pans out as a creative camera tool.
Image Noise:
As you might expect the image noise levels are quite high, well it is a very small sensor, but it is better than quite a lot of other camera phones. The ISO range runs from approximately 70 though to about 1000, you have no direct control over it but you can be sure of one thing, the ISO will always go higher as the light level drops, so if noise is a problem to you take that into consideration.
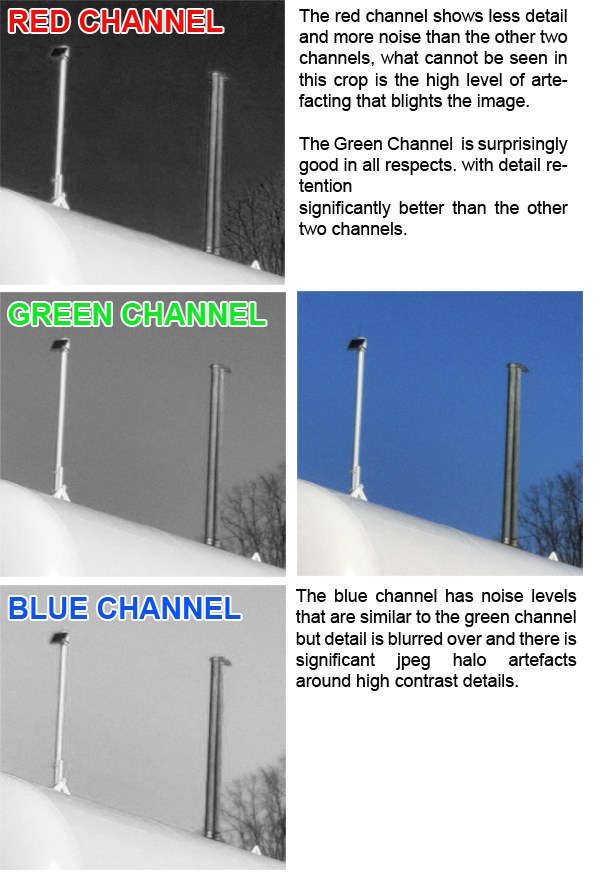
When you examine the noise characteristics in a Photoshop by splitting the image into its 3 colour channels you see the huge difference between the red channel and the blue/green channels. The red channel has both very high noise levels which would be OK if it were tight and granular, unfortunately it is a splotchy mess. The Red channel is pretty horrible regardless of what the ISO.
The Green channel like most compact cameras of all types is significantly better than the blue and red, in fact if you isolated the green channel alone you could produce quite nice monochrome images, assuming the tonal rendition matched your needs. I have in fact made several monochrome images from my iPhone pics this way and the results have all been quite good.
The blue channel is not bad; the noise is fairly tightly structured and really only gets out of hand under low light levels where the ISO is pushed to higher settings. The Red channel is pretty horrible regardless of what the ISO is.
In actual photos I would say most of the visible noise is luminance noise, so it has a monochromatic granular look, rather than the strong chrominance noise I have seen with a lot of camera phone images. It is likely that the in camera software is applying significant blurring to the chrominance information and I suspect it applies a far higher degree of noise reduction to the red channel. Overall luminance noise is not a problem to me, I rather like the way it interplays with texture and tone and I often add noise to my pics to bump the effect up.
Colour Reproduction
Like a lot of compact cameras and camera phones the iPhone 3GS tends to over-saturate a lot of colours, this is especially the case with many orange/ magenta/reds. Not an unusual characteristic, in fact a lot of Canon DSLRs of old did much the same thing. Greens and blues are all OK, with foliage and brown tones actually very good. I don’t get too hung up on colour reproduction issues as unless the results are completely off the wall I can usually fine tune things in any decent editing program and that includes most of the better editing apps on offer for the iPhone.
Detail Reproduction:
Not good I am afraid, high contrast information seems to reproduce quite well but low contrast detail simply gets mushed up and thus gives the images a low-res look. When you compare the images to an older 3 megapixel compacts like a Canon A70 it is clear they resolve more information than the iPhone, but the difference is not huge.
Distortion:
Really very good, there is almost no chromatic aberration, and in this respect it is a lot better than most compact cameras I have used. Barrel distortion is a non-issue unless you are being critical and I’ve had little need to apply any corrective adjustments even with architectural style shots. The solid performance in this area is likely due to the lens being a fixed aperture/fixed focal length design; it is just much easier to get such a simple design optically correct. Oh by the way the focal length is just 3.8 mm and the aperture is fixed at f2.8
JPEG artefacts:
To my mind this is the iPhones Achilles heel, in some ways the degree of artefacts produced are at odds with the file size as whilst files are often in the range of 600kb to 1mb they generally show far more artefacting that files from older 3 mp compacts that have similar recorded file sizes.
The artefacts are particularly obvious in the red channel and show odd random patterning with significant haloing around high contrast details. The green channel by comparison shows virtually no artefacting and the blue is somewhere in the middle.
If you really want to get the best quality out of the iPhone 3Gs for larger prints this is going to be the hardest issue to work around unless there is some change in the phones camera software. The red channel artefacting becomes particularly bothersome in sky areas and around foliage and never gives an effect that could be interpreted as arty.
Camera Movement Issues
I suspect that a lot of the issues relating to resolution are actually tied to camera movement. It seems that the Iphone often chooses to keep the ISO a low as possible and thus often trades off the shutter speed as a result. In normal shooting shutter speeds can often be as low as 1/30 sec which may sound OK but the iPhone is not the easiest tool to hold steady due to its shape and shutter release arrangement. I know from experimentation that having the camera firmly mounted on a tripod or some other support always makes a huge difference to the overall image clarity.
White Balance
There is no way to exercise any control over the white balance of the images at capture time, of course it is easily tuned afterwards, thankfully the iPhone seems to nail a white balance setting pretty close to what’s needed most of the time.
An easy way to gauge this is bring up a gallery of unedited iPhone pics and look at the thumbnails side by side; doing this in iPhoto reveals far fewer miscoloured images than I seem to get with most compact cameras used on full AWB
Most images just need a small amount of fine-tuning, it is rare to find and image that has a strong case of the blues or yellows, which is something even a lot of DSLRs seem to get under day to day shooting.
Highlight Bleaching
Like pretty much any other camera that uses a very small sensor the iPhone is prone to bleaching of the highlights, though I must add it is no worse than most. There is no post capture fix for this but a really good alternative is to use one of the HDR programs available for the iPhone.
Alternatively when shooting make sure you set the exposure by touching on a lighter past of the image, this will cut back the overall exposure giving you dense shadows, but it will preserve the highlights better and editing can later be used to optimise the image.
Banding
Even without any post capture tonal or colour adjustments the files from the iPhone run very close to banding in smooth tones areas, close inspection of sky area will often reveal abrupt colour changes. This has serious ramifications for shooting with the iPhone, as ideally you want to make sure you get an exposure that is a close as possible to your final desired result especially with regard to skies.
An image like this is typical of those that cause banding problems, especially if post capture editing is not carefully implemented
Patterning:
One aspect of low-resolution digital files rarely discussed is the pattern of the images structure; this can be quite variable and is easy enough to see if you zoom into around a 200% view.
The underlying pattern is closely related to how the jpeg compression is handled, in some compacts such as Canons classic A70 (shown) there is very little pattern at all, just random noise. Some have quite objectionable patterns; the Panasonic FZ3 is such an example. So where does this leave the iPhone, well it looks a lot like a canvas with the threads running diagonally.
And why you may ask is this important, simple, if you wish to upsize your images to produce much larger prints the pattern/texture will become very obvious. The good news is that whilst the iPhone has a pretty obvious pattern it could actually be used to artistic effect, where as most, like the Panasonic FZ3 will look horrible without some serious modification work.
Depth of Field
Well pretty much everything is in focus unless you are focused on something very close to the camera, which incidentally will focus down to about 60 mm or so. The great thing with having such extensive DOF is you can fine tune things for effect later.
In Summary
What we have with the iPhone is a device that through a combination of low resolution, relatively high contrast, reasonable colour accuracy, and predominantly luminosity based noise creates images out of the box that are no too different to that produced by instamatic/automatic style film cameras, except with a bit more detail than they offered. As such the iPhone 3Gs forms a good basis for taking arty style images that can be quite delightful. I feel the low resolution is actually a bonus, it simply eliminates distractions and concentrates the eye on from and colour and gives a quite painterly feel to things.
You can easily make 5 by 7 inch prints from iPhone 3GS files, I have made several 8 by 10 inch prints without trouble and the small “Polaroid style” images are just gorgeous printed on high gloss stock with the colour slightly exaggerated.
Could you go bigger than 8 by 10, yes with clever post capture editing in Photoshop or a similar program you could make large arty 20 by 16 inch or bigger prints. I will provide some hints on how this can be achieved in the last instalment.
In the next instalment I will discuss how to actually get the best quality from your Iphone 3GS at shooting time, and we will look at a few great apps you can use to help you get all creative. Our final instalment will look at a few tricks you can try in your photo editing program to really lift your iPhone images beyond the ordinary.
About the author:
Brad Nichol hails from Goulburn a small city in country NSW, Australia. Brad owns and runs Zero One Imaging, a business devoted to digital imaging training and producing high-end photography spanning a broad spectrum. The Zero One Imaging Website 01imaging.com is full of helpful information, great images and a source for inspiration.
 Brad’s photography is guided by a simple principle, “always discern the difference between photographic fashion and timeless image capture”. Brad is a composition driven photographer and has developed a comprehensive and highly specialised process called TLC (True Light Capture System) to capture and cultivate the pixels of his images to visual perfection. The website 01imaging.com will give some insight into the quality of his eclectic photography and style, there of course some great photographic art works available for purchase. The website is regularly updated and true to Brads’ teaching principles he his happy to respond to emails and questions.


Pingback: Cool Truck Games images | Truck Racing Games
Pingback: 200 Awesome Fresh Articles for Designers and Developers | tripwire magazine
Pingback: 200 Awesome Fresh Articles for Designers and Developers | TechFleck
Pingback: AnimHuT User-Link Feed 2010: JULY05-July11 » jQuery, Design, Tutorials, Your, iPhone, Free » AnimHuT