
Have you seen a lot of people with a DSLR camera? I have, especially tourists. But I wonder why they need such an expensive camera when a much cheaper one would do the job just as well. Is it just because of “professional” look and, possiblly, the quality of the image? I guess, yes to both.
When I was younger, I was expressing a lot of interest about photography, but even during the time of my first DSLR I didn’t use all the posibilities it offered. Well, probably, I just didn’t know them. So what were these things that I did not know?
- Surely, read the manual – you might discover bunch of new things
- Understand how the ‘Manual mode’ works
- And shoot pictures in Raw format
So you may wonder what is Raw and why you need it?
Basically, Raw is an image format which contains the most of the possible data from your image sensor in the camera. It’s called Raw because it is not processed or edited in any way, and therefore it’s also called “digital negative”. Whereas wide known JPEG file format is “positive” because it’s already processed through Raw converter and it has specific white balance, exposure, contrast and other parameters.
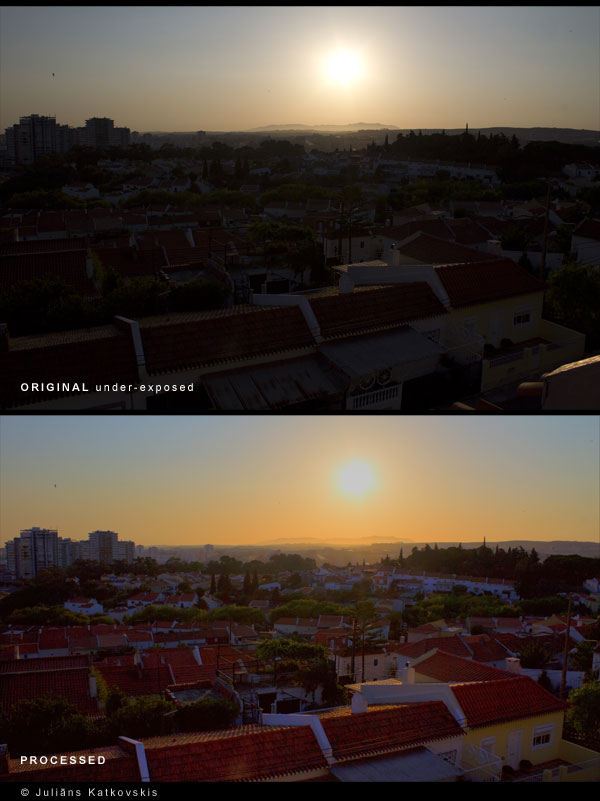
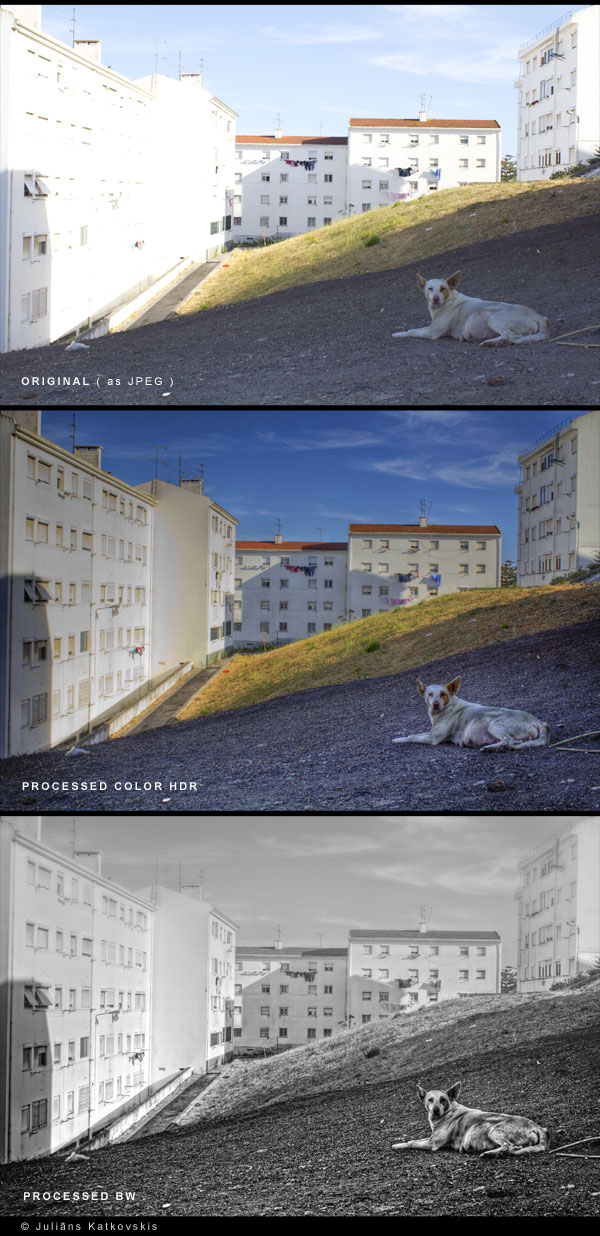
When I discovered Raw format, I couldn’t imagine why I hadn’t known that before and why nobody insisted working with it. So here is an example what I am talking about.
ADVANTAGES
- Huge control! You may vary and manipulate a lot of parameters, such as exposure, contrast, clarity, white balance, hue, saturation, levels etc.
- Higher image quality. Because of all calculations, pixel values are more precise, and the end result photo is rendered more accurately.
- Possibility to control the exposure, and to correct under or over-exposed photo without having visible loss of information.
- Skipping the camera’s automatic processing such as image sharpening and noise reduction. It gives you the possibility to set it manually with software
- Having 12 or 14 bits of intensity information. Again, it means more information and accuracy in working with colours, highlights and shadows. JPEG format stores only 8 bits.
- You can choose the colour space.
- And it also allows you to be more artistic and make so popular HDR photos.
DISADVANTAGES
- Raw files usually are much larger than JPEG, for example one 8Mpx cameras file is about 6-8 mb, but 18Mpx is already 20-30 mb
- Extra time to reduce file size by converting to DNG if it’s not camera’s standart (optional)
- You must have some raw image processing software, for example Camera Raw
- It takes a lot of time to process photos
Raw format files in every camera have their own format name. For example Canon has “CRW and CR2”, Nikon “NEF”, Pentax “PEF”, Olympus “ORF”, Mamiya “MEF”. But in 2004 Adobe launched a format to standartize all these formats into one “DNG” which means “digital negative format”. A lot of companies use this format, but not the most popular ones.
If all this looks complicated…it’s not. It takes time to get used to spend more time processing photos, but I guess the perfect image is why we take photos in the first place. So, what to do next and which are the software that come in handy?
1. Adobe’s Camera Raw and Bridge ( Mac and Win )
Adobe Bridge is media manager, organizer of your files, like a library. And Camera Raw is Photohop’s plug-in that allows you to work with Raw format.
2. Adobe Photoshop Lightroom ( Mac and Win )
This is library, developing room, publishing and printing software in one. Very easy to understand with customizible interface.
3.Apple Aperture ( Mac )
Software similar to Lightroom
4.Phase One Capture One ( Mac and Win )
5. DxO Optics Pro ( Mac and Win )
6. Bibble ( Mac and Win and Linux )
7. RawTherapee ( Mac and Win and Linux )
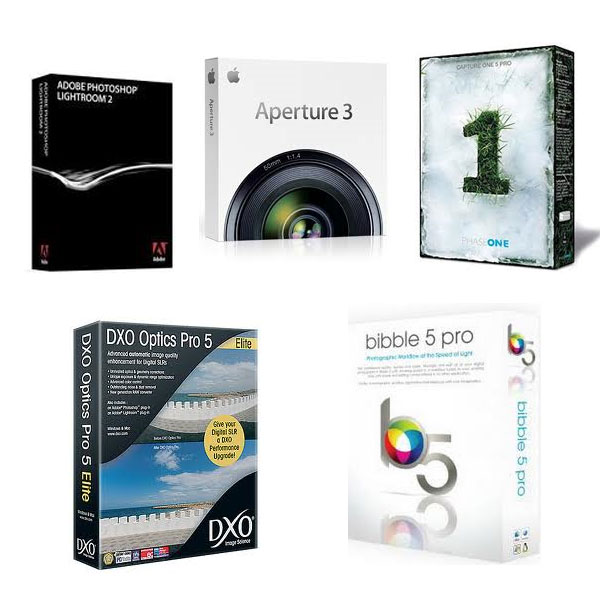
There are more, but they all are more or less similar. That’s why I’m just giving a brief introduction mentioning them. I will be comparing the software in my next article.
CONCLUSION
If you are seriously considering doing photography then keep in mind things I mentioned here and give them a try. Build up your own library, organize photos, process them and make yourself a level up !


Pingback: Digital Darkroom Software Battle