Orton Photoshop Tutorial: Create That Dreamy Effect

April 26, 2010 · 24 comments

in Photoshop Tutorials

The Orton effect is named after the photographer Michael Orton who created this technique. Originally, it involved combining two slide films of the same scene together. One slide would be sharp and overexposed by two stops. The other slide would be blurry and overexposed by one stop. When the two slides came together as one, it would produce an image that was dreamy with a glowing haze.

Now with the magic and convenience of Photoshop, you’re able to produce a similar effect quick and easy – no slide films involved!

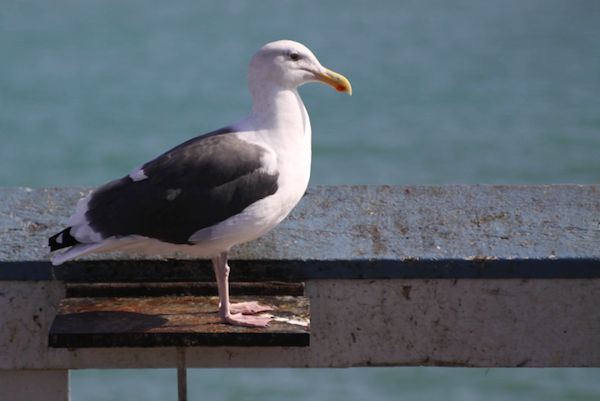
Turn an ugly seagull:
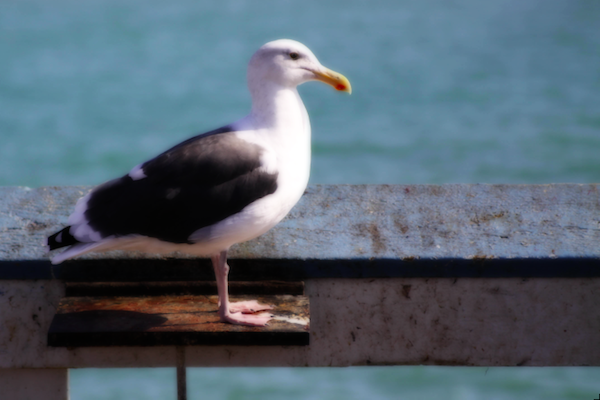
Into a dreamy one:


Creating the sharp, overexposed image

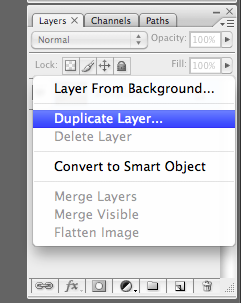
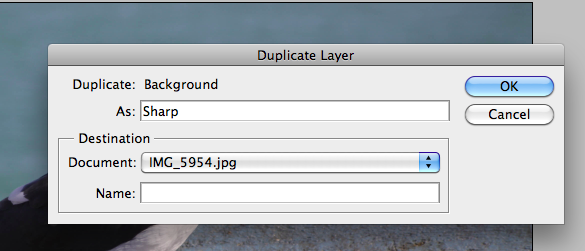
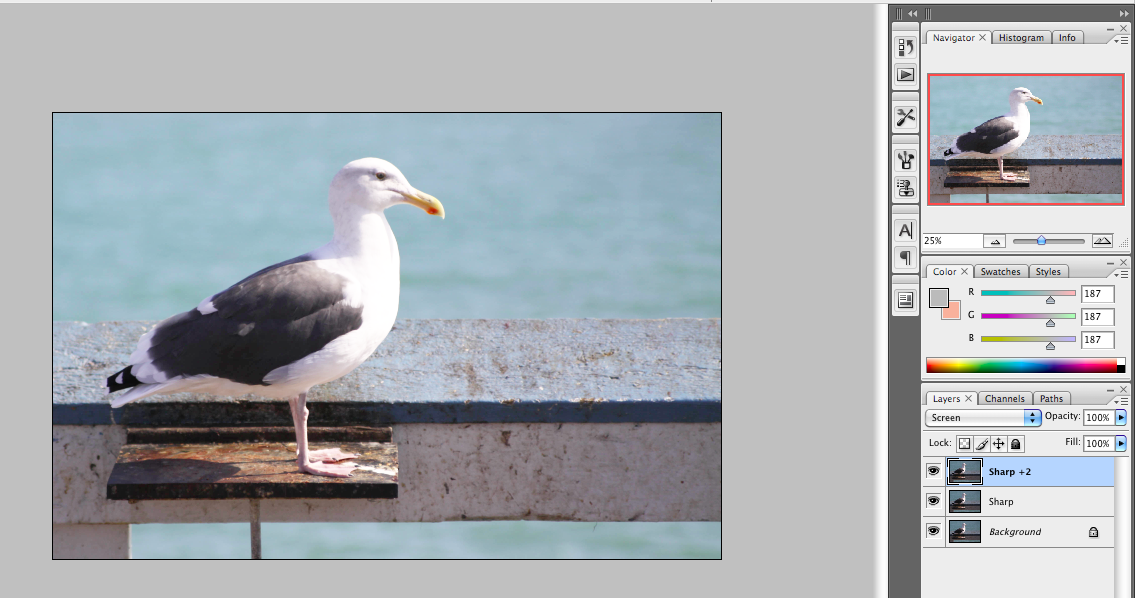
Open your image in Photoshop. Now duplicate the background and call that layer “Sharp”

Duplicate that layer again and call it “Sharp +2”

Click on the layer “Sharp +2” and set the blending mode from normal to screen. That should brighten the image.

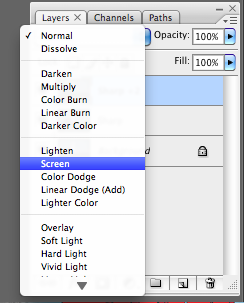
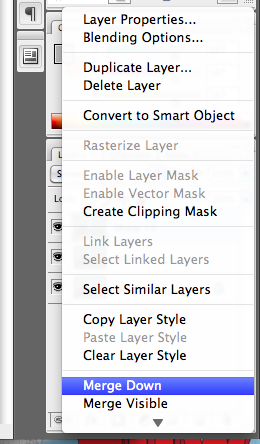
Right click the “Sharp +2” layer and click on Merge Down to combine the two sharp layers.


Creating the blurry image

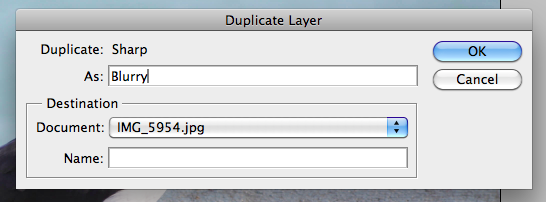
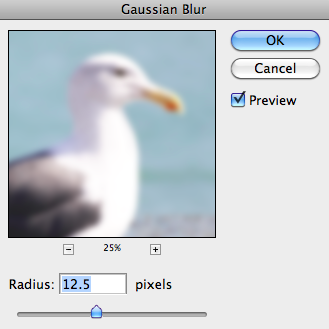
Duplicate the Sharp +2 layer and call this new layer “Blurry”

Now on the top menu, go to Filter > Blur and then select Gaussian Blur

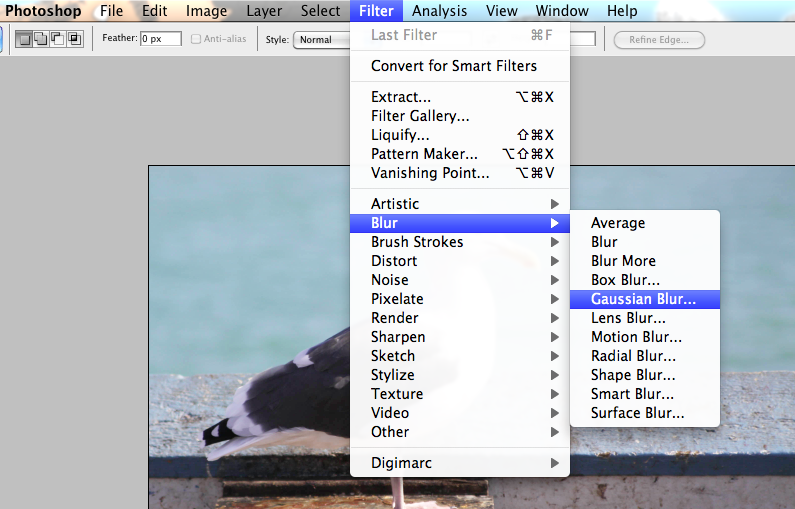
This where you would need to play around with the amount of Gaussian blur to apply. You want it to a level where the details are too blurred to be distinct, but the shape of the object can still be recognized. In this case, I’ve set it to 12.5. In general, the bigger the megapixel, the more blur you’d need to apply.

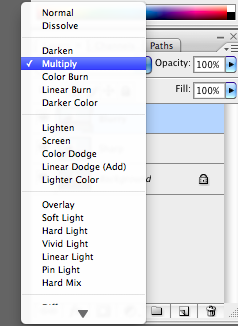
On the Blurry layer, change the blending mode to Multiply.

And there you have it! You can play around it with some more, by adjusting the opacity levels of the Blurry layer or have a go tweaking some Curves and Saturation. I’ve left it as it is.


You’d find some objects and situations work better with the Orton effect than others. Experiment and let us know what you come up with!

Article by

1 part ad agency. 2 parts freelancer. An avid urban photographer, traveler, and streetwear lover. Geeky curator of all things awesome. Sustains on Vegemite, meat pies and lamingtons. Follow me on Twitter or Flickr.

Yi has written 69 awesome articles for us at Photoble

  • http://Jamesies.blogspot.com Jamesies

    looks like somehow out of focus shot X_X~
    kinda like the dreamy feels it gave =]

  • http://Jamesies.blogspot.com Jamesies

    looks like somehow out of focus shot X_X~
    kinda like the dreamy feels it gave =]

  • http://Jamesies.blogspot.com Jamesies

    looks like somehow out of focus shot X_X~
    kinda like the dreamy feels it gave =]

  • http://www.aisajib.com Aminul Islam Sajib

    Some people would call the after photo to be blurred when taking and would think that it’s a faulty one. πŸ˜€ By the way, I think the first one looks nice. πŸ˜€

  • http://www.aisajib.com Aminul Islam Sajib

    Some people would call the after photo to be blurred when taking and would think that it’s a faulty one. πŸ˜€ By the way, I think the first one looks nice. πŸ˜€

  • http://www.aisajib.com Aminul Islam Sajib

    Some people would call the after photo to be blurred when taking and would think that it's a faulty one. πŸ˜€ By the way, I think the first one looks nice. πŸ˜€

  • http://www.twitter.com/yiiee Yi

    You can try applying less Gaussian Blur to the photo for something sharper. However, I guess that would defeat the whole Orton effect. I tried this effect with a portrait photo and it turned out pretty nice too. πŸ™‚

  • http://www.twitter.com/yiiee Yi

    You can try applying less Gaussian Blur to the photo for something sharper. However, I guess that would defeat the whole Orton effect. I tried this effect with a portrait photo and it turned out pretty nice too. πŸ™‚

  • http://www.twitter.com/yiiee Yiie

    You can try applying less Gaussian Blur to the photo for something sharper. However, I guess that would defeat the whole Orton effect. I tried this effect with a portrait photo and it turned out pretty nice too. πŸ™‚

  • http://www.aisajib.com Aminul Islam Sajib

    I don’t know why I was unable to do this. After blurring the photo, I get stuck. Moving opacity doesn’t make any changes. πŸ™ Don’t know what to do.

  • http://www.aisajib.com Aminul Islam Sajib

    I don’t know why I was unable to do this. After blurring the photo, I get stuck. Moving opacity doesn’t make any changes. πŸ™ Don’t know what to do.

  • http://www.aisajib.com Aminul Islam Sajib

    I don't know why I was unable to do this. After blurring the photo, I get stuck. Moving opacity doesn't make any changes. πŸ™ Don't know what to do.

  • http://www.salenewbalance.com new balance shoes

    Well , the view of the passage is totally correct ,your details is really reasonable and you guy give us valuable informative post, I totally agree the standpoint of upstairs. I often surfing on this louis vuitton for sale forum when I m free and I find there are so much good information we can learn in this forum!

  • http://www.twitter.com/yiiee Yiie

    Sorry for the late reply, didn’t see your comment until today. Check one of the following:

    1. Have you duplicated the layer originally?
    2. If you have, make sure that you’re applying the blur to the top layer.

    Cheers

    Yi

  • http://www.twitter.com/yiiee Yi

    Sorry for the late reply, didn’t see your comment until today. Check one of the following:

    1. Have you duplicated the layer originally?
    2. If you have, make sure that you’re applying the blur to the top layer.

    Cheers

    Yi

  • http://www.aisajib.com Aminul Islam Sajib

    Hi, I succeeded! πŸ˜€

    One little request, your tutorials are very easy to understand and guided in a simple way. However, if you could also write “why” certain things need to be done (just like why I need to copy the Sharp layer again), it could be more helpful for dummies like me. πŸ™‚

    Hope you keep this in consideration.

  • http://www.twitter.com/yiiee Yiie

    Glad to hear that it worked! I usually try to explain stuff but I guess it’s hard to cover everything in one tute! The only reason why we essentially have two sharp layers initially is because we end up merging the two together. If we had one, it would merge with the original background layer, which is locked and doesn’t give us the flexibility to play around with it.

    I guess I’m also just in the habit of always copying the background layer to begin with!

  • http://www.twitter.com/yiiee Yi

    Glad to hear that it worked! I usually try to explain stuff but I guess it’s hard to cover everything in one tute! The only reason why we essentially have two sharp layers initially is because we end up merging the two together. If we had one, it would merge with the original background layer, which is locked and doesn’t give us the flexibility to play around with it.

    I guess I’m also just in the habit of always copying the background layer to begin with!

  • http://www.aisajib.com Aminul Islam Sajib

    That’s all right. πŸ™‚ One question, what happens if I blur more (note that the image I’m working with was taken with a digital camera so you know that’s of more MP)?

  • http://www.aisajib.com Aminul Islam Sajib

    That’s all right. πŸ™‚ One question, what happens if I blur more (note that the image I’m working with was taken with a digital camera so you know that’s of more MP)?

  • http://www.twitter.com/yiiee Yiie

    You can definitely blur more if you want to, as it’d create an even more dreamy kind of effect. No right or wrong here, just experiment with the amount of blur and opacity. Hope that helps! )

  • http://www.twitter.com/yiiee Yi

    You can definitely blur more if you want to, as it’d create an even more dreamy kind of effect. No right or wrong here, just experiment with the amount of blur and opacity. Hope that helps! )

  • Natalie

    Thanks so much for this! Very very useful, and the best redintion of this effect I have found so far online! πŸ™‚

Previous post:

Next post: