Photoshop Tutorial: Vintage Crumpled Photo Effect

June 7, 2010 · 16 comments

in Photoshop Tutorials

There are lots of tutorials that teach you how to touch up an old photograph to make it look new again. However, this tutorial will teach you the opposite of this effect and show you how to make a modern-looking photo appear old and tattered in Photoshop.

This tutorial will also give you the basics on how to apply a texture layer to a photo. Once you’ve mastered this simple technique, the creative possibilities are endless.

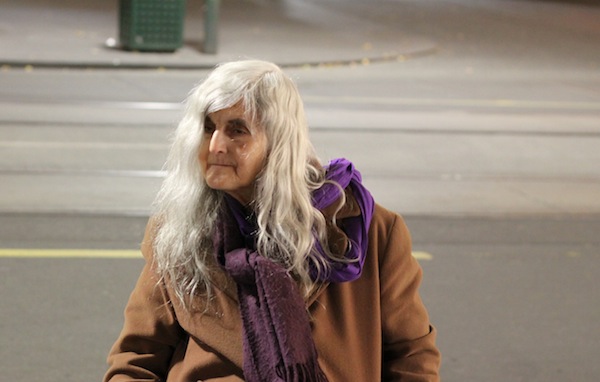
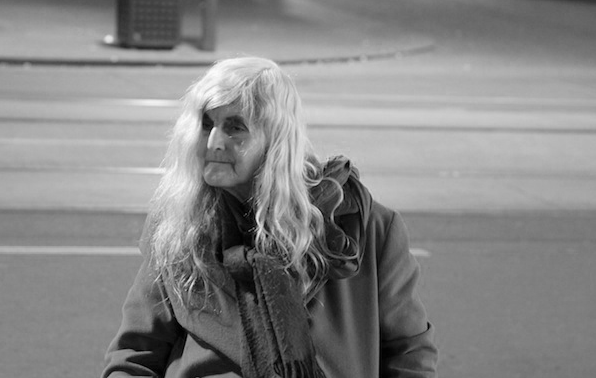
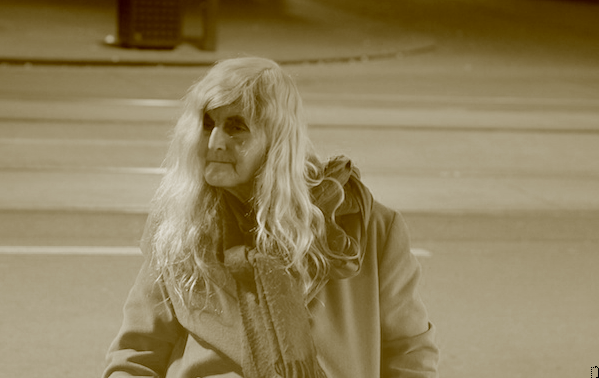
I’m going to show you how to turn a photo like this:

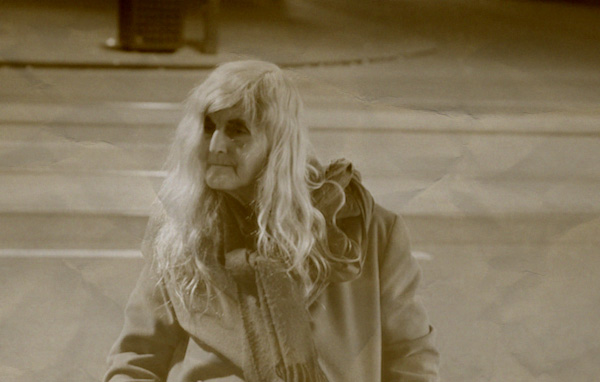
Into something like this:


1.) Duplicate the Background Layer

Before you start rendering a photo, it’s always good to get into the habit of duplicating the background layer first. Just in case something happens and you wish to revert back to the original. It also allows you to do a quick comparison too.

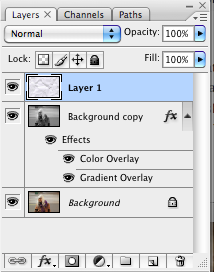
To duplicate the layer, right click on the background layer and click on Duplicate Layer.

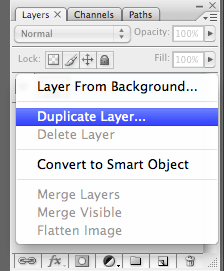
We will mainly be working on the Background Copy layer.


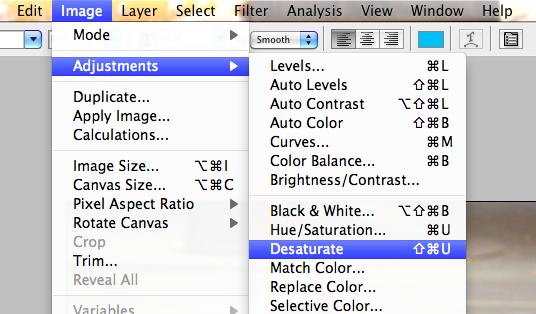
2.) Apply Sepia Tone to the Photo

Firstly, desaturate the photo, which is just a button click away.
Image > Adjustments > Desaturate

Now, you could just stop here if you want to create a black and white image. However, we’re going to go one step further and apply a sepia tone.

There are lots of ways to go about in apply a sepia tone. To keep things simple and fast, here’s the quickest way that would have you grinning.

See the window just above the layers with all the colors and swatches? Click on Styles.

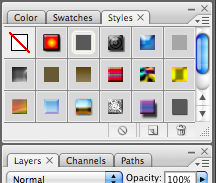
If that window is hidden, you can bring it up by clicking:
Window > Styles

Hover over the different Style panels until you see the Sepia Tone and just click on it. And viola!

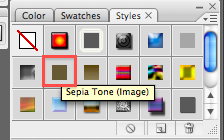
But another effect I really like and going to use, is the Sun Faded style effect. It’s right next to the Sepia Tone.

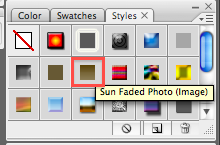
I think the Sun Faded style effect has a more of a vintage feel and look to it.


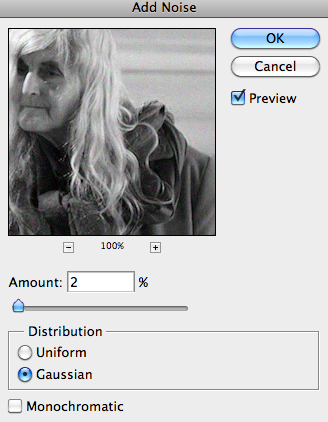
3.) Apply Some Speckles & Blur

We’re going to distort the photo a bit by adding some subtle noise and blur to it.

To apply the speckles, go to
Filter > Noise > Add Noise

I’m going to make sure that Gaussian is selected under Distribution and make the amount to 2%.

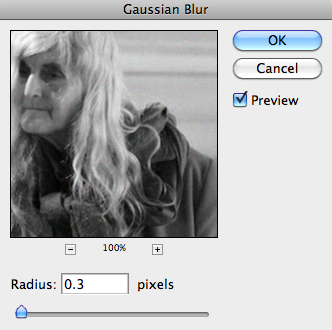
Now for the blur, go to
Filter > Blur > Gaussian Blur

We only require a bit of blur, so I’ve set the radius amount to 0.4 pixels.


4.) Apply the Texture

I’m going for a crumpled paper texture and I’ve sourced the one below from CG Textures.

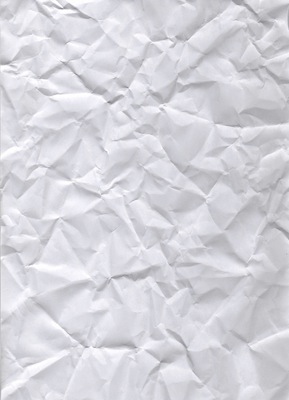
Open this texture up in Photoshop and drag it to the workspace we’re working in with the sepia photo. It would create a new layer and you should have something like this:

Now, set the Blending Mode to Multiply and the Opacity to around 60%.

And there you have it, your very own crumpled, vintage sepia photo!

You can experiment with other tones and textures and see what you come up with. Have a vintage photo to show us? Post the link below!

Article by

1 part ad agency. 2 parts freelancer. An avid urban photographer, traveler, and streetwear lover. Geeky curator of all things awesome. Sustains on Vegemite, meat pies and lamingtons. Follow me on Twitter or Flickr.

Yi has written 69 awesome articles for us at Photoble

  • http://www.carletoncreative.ca matthew carleton

    I gotta say this looks unrealistic. For any seasoned photoshop user it would be obvious that you just overlayed a crumbled paper image over an original photo.

  • http://www.twitter.com/yiiee Yi

    Hi Matthew,

    Thanks for your honest opinion. Most of the readers on Photoble are beginners and as you can see from our previous Photoshop tutorials, we try to keep them fun and easy without being intimidating or complicated.

    Nevertheless, if you have a link to a tutorial that would suit the more advanced Photoshop users, that would also be much appreciated.

    Cheers

    Yi

  • Pingback: Nashville Roofing: Heat Island Effect | Tennessee Roofing Experts

  • http://www.carletoncreative.ca matthew carleton

    I gotta say this looks unrealistic. For any seasoned photoshop user it would be obvious that you just overlayed a crumbled paper image over an original photo.

  • http://www.twitter.com/yiiee Yiie

    Hi Matthew,

    Thanks for your honest opinion. Most of the readers on Photoble are beginners and as you can see from our previous Photoshop tutorials, we try to keep them fun and easy without being intimidating or complicated.

    Nevertheless, if you have a link to a tutorial that would suit the more advanced Photoshop users, that would also be much appreciated.

    Cheers

    Yi

  • Pingback: Riley The English Mastiff Dog – Funny Pictures of Puppy Dogs … | adoptionmastiff

  • Pingback: Popart » Blog Archive » CustomArtOnline.com โ€“ Landing Page Article โ€œPop Artโ€

  • eoin

    Hi although I am an experienced photoshop user I just wanted to say that this is a great tutorial for people just starting out with photoshop. Nice an simple while teaching a few useful features.

    Nice one!

  • eoin

    Hi although I am an experienced photoshop user I just wanted to say that this is a great tutorial for people just starting out with photoshop. Nice an simple while teaching a few useful features.

    Nice one!

  • http://boxedindesign.com BoxedinDesign

    I think you should just add to this tut by doing some feathering techniques on the lines across the woman. Add some warping to her so the page doesn’t look so flat – and then give the crinkles some highlights and shadows. Then you can repost that as Part 2 – the more advanced version. That would make many of your tuts more fun. I think you do a great job on them no matter for beginner or advanced.

    Even professionals find little tips they never knew about or they forgot about. Small but faster methods for enhancing an image.

  • http://boxedindesign.com BoxedinDesign

    I think you should just add to this tut by doing some feathering techniques on the lines across the woman. Add some warping to her so the page doesn't look so flat – and then give the crinkles some highlights and shadows. Then you can repost that as Part 2 – the more advanced version. That would make many of your tuts more fun. I think you do a great job on them no matter for beginner or advanced.

    Even professionals find little tips they never knew about or they forgot about. Small but faster methods for enhancing an image.

  • http://www.twitter.com/yiiee Yi

    Thanks for your feedback! ๐Ÿ™‚

  • http://www.twitter.com/yiiee Yi

    Thanks heaps! Will definitely consider a part 2 to this tutorial then. Have subscribed to your blog and following you on Twitter. Great site btw! Love the tips and videos… giving me some ideas for our next post, will be sure to give you a mention! ๐Ÿ™‚

  • http://www.twitter.com/yiiee Yiie

    Thanks for your feedback! ๐Ÿ™‚

  • http://www.twitter.com/yiiee Yiie

    Thanks heaps! Will definitely consider a part 2 to this tutorial then. Have subscribed to your blog and following you on Twitter. Great site btw! Love the tips and videos… giving me some ideas for our next post, will be sure to give you a mention! ๐Ÿ™‚

  • Stranger Lover

    hi yi,
    its awesome
    please post a face retouching tricks also

Previous post:

Next post: