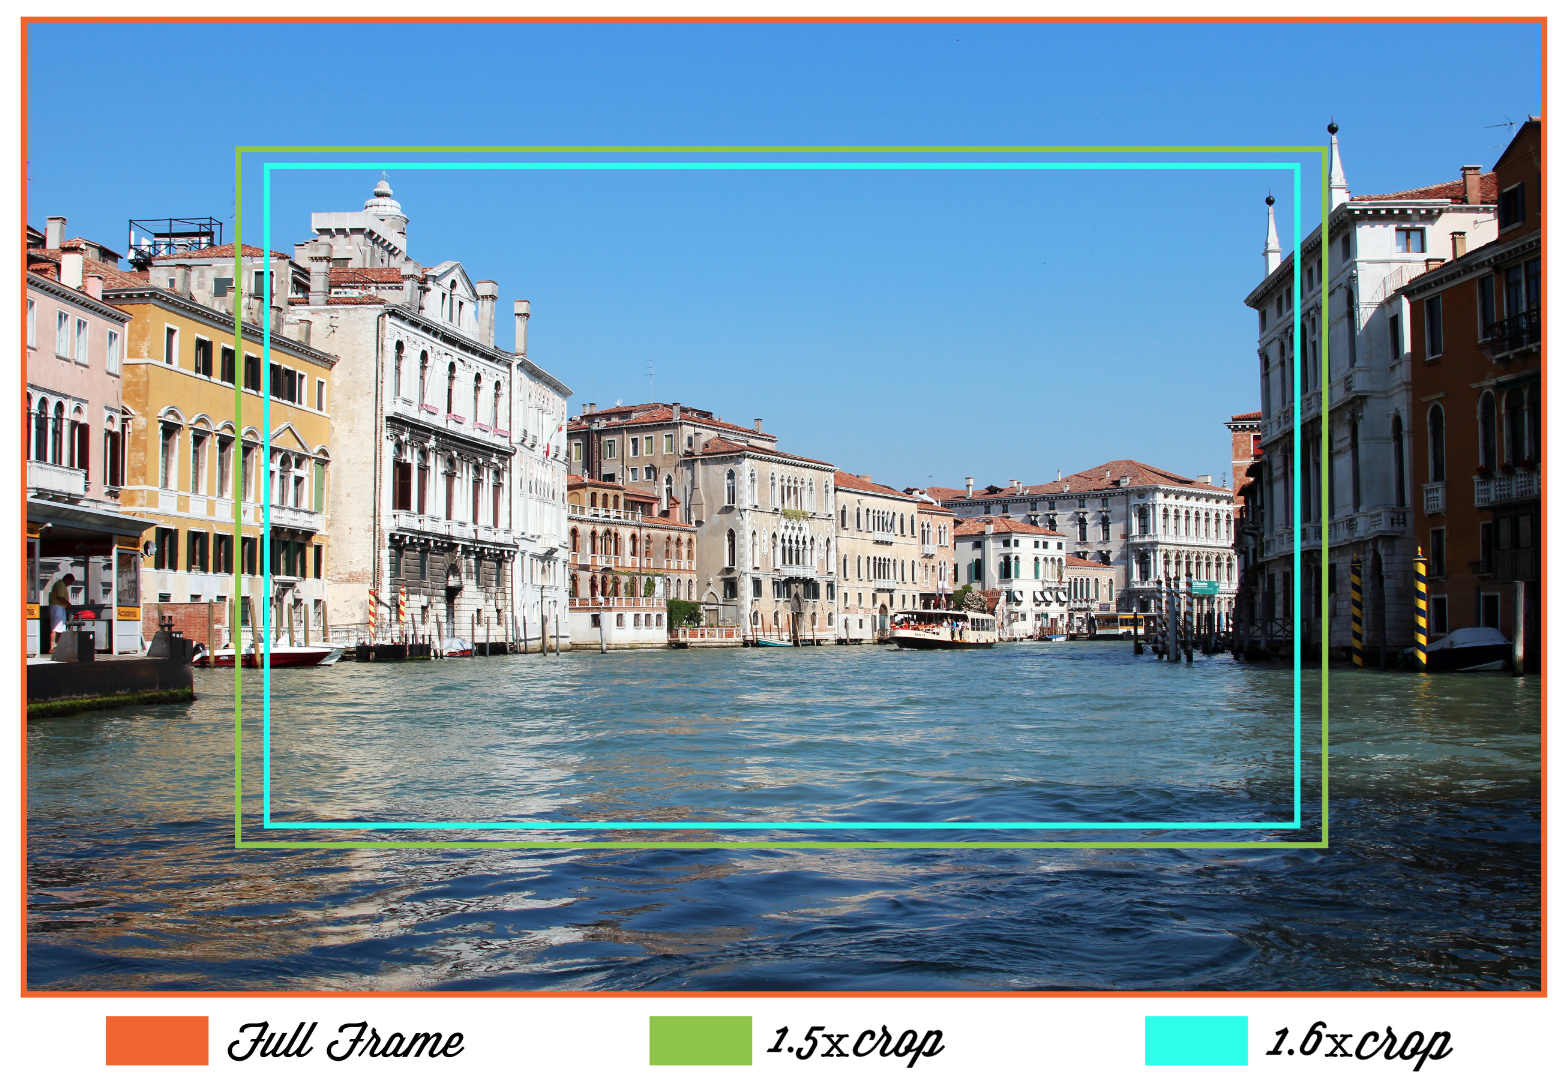
How a Camera’s Resolution and Specs Impact Photo Quality

Whether you’re involved in print or web design, the various design elements—such as typography, shapes, lines, colors, spacing, and images or graphics—need to work together to produce a coherent and engaging visual design. Photographs are an important element of many visual designs, and graphic designers need to use high-quality photographs at the right resolution to ensure sharp and detailed results for print and web.

Photographic Image Quality and the Camera

Photographic image quality refers to the perceived sharpness, contrast, detail, and color rendition of the viewed image. Although post-processing and printing can dramatically impact the final result, no amount of digital manipulation can overcome flaws in the original out-of-the-camera file.

Photographic image quality depends on many factors, including the camera’s resolution and specs. In digital photography, the camera’s resolution is measured in megapixels (i.e. millions of pixels), and resolution describes both pixel count and pixel density. Camera resolution affects print size, cropping options, image resizing, and display quality on high-resolution monitors.   

Contrary to popular belief, a camera’s megapixel rating (i.e. the number of megapixels a camera can capture in a single shot) does not impact photographic image quality. In fact, high megapixel ratings on smaller cameras often result in greater noise and inferior image quality.

On the other hand, certain camera specifications can tell you a lot about the camera’s potential image quality, and these are all related to the camera’s sensor.

Camera Specs that Affect Photographic Image Quality

Image Sensor

A digital camera’s image sensor detects and conveys the information that results in an image. When you take a photo, the sensor is exposed to light while other components in the camera record what the sensor sees. There are many types of camera sensors, and the four most relevant are cellphone and point-and-shoot sensors, Micro Four Thirds sensors, APS-C sensors, and full-frame sensors.

  • Cellphone and point-and-shoot sensors: Cellphone and point-and-shoot cameras tend to have tiny sensors. This often results in inferior image quality because a tiny sensor can only accomplish so much.
  • Micro Four Thirds sensors: Many Olympus and Panasonic cameras use Micro Four Thirds (MFT) sensors. Measuring 17.3mm x 13mm, Micro Four Thirds sensors are a compromise between the larger sensors of DSLRs and the smaller sensors of point-and-shoot cameras. Cameras that use Micro Four Thirds sensors accommodate interchangeable lenses, and users can take higher-quality images while handling a camera body that’s less bulky than the average DSLR.
  • APS-C sensors: These are commonly found in DSLRs, though they can also be found in some compact cameras. APS-C sensors give users greater control over depth of field. APS-C sensors measure 25.1mm x 16.7mm and are considerably smaller than the sensors found on full-frame cameras. Because of the crop factor (which magnifies the attached lenses), users who want to take wide images will need to buy wider lenses.
  • Full-frame sensors: These sensors are the digital equivalent of 35mm film (which measures 36mm x 24mm). Unlike APS-C sensors, full-frame sensors do not have a crop factor. As a result, DSLRs with full-frame sensors can capture higher-quality images, handle low-light situations well, and produce a very shallow depth of field. 

As a rule of thumb, the bigger camera sensors tend to produce higher-quality images, though this is not always the case. While you need to pay attention to more than just the camera’s sensor when assessing potential image quality, the sensor size is a great place to start when comparing the specs of different cameras.

Image Processor

The camera’s image processor won’t affect photographic image quality directly, unless you’re shooting in JPEG. A camera armed with a good image processor will enable it to fix lighting issues and adjust other settings that can positively impact photographic image quality.

A good image processor also enables a camera to capture images in quick succession. While this feature won’t affect image quality directly, continuous image capture (also known as burst mode) can mean the difference between getting a good shot and getting an excellent shot.

Lenses

It may surprise you that lenses have a bigger impact on photographic image quality than the camera body (which explains why some lenses cost more than camera bodies). Long-time owners of cameras that accommodate interchangeable lenses know just how important a good lens can be to producing high-quality images.

The lenses on point-and-shoot cameras and lower-end smartphone cameras tend to be of inferior quality because they’re tiny and are fixed to the camera. DSLRs and mirrorless cameras offer users greater versatility and superior photographic image quality because they can accommodate interchangeable lenses. With interchangeable lenses, users can choose specific lenses to suit different photographic scenarios.

When trying to determine the quality of a lens, you should start by looking at its maximum aperture or how wide the lens can open. Wider apertures allow in more light, which enables you to take photos more easily in low-light situations. Lens apertures are rated in f-stops. For example, if your lens has an f-stop of f/3.5, it has a maximum aperture, or f-stop, of 3.5. Wide apertures are generally considered to be in the range of f/1.4 to f/2.8.

Other Factors Also Determine Photographic Image Quality

There are other factors outside the camera that determine photographic image quality—including the photographer’s focus and exposure, as well as the recording format chosen by the photographer. However, by assessing the most vital camera specs, you can more accurately determine the camera’s potential image quality and source high-quality photos for your designs.

Beginners Guide To Buying Lenses

There has been a constant “chicken or the egg” debate going on in the photography world for years. Is it the camera body, or the “glass” that carries the most value?  In my humble opinion, it’s both. The relationship between camera and lens is much like that between the head and heart; each is vital.

Buying your first DSLR and set of lenses is a huge investment with plenty of factors to consider. When it comes to lenses, being a tactical shopper will save you a lot of financial headache down the road.

As your photography progresses, so should your equipment. In your first DSLR days, the camera body and stock lens are the perfect tools for learning to capture gorgeous, successful photos in all situations. At this point, the most important thing you can do is familiarize yourself with how the ISO, shutter speed and aperture act as a checks-and-balances system to ensure proper exposure and clear focus. Understanding these components is essential to working your way though tricky lighting, and ultimately generating creative, well-composed photographs.

As you begin to understand depth of field (produced by your aperture) and what the range from 15mm to 300mm means to your photographs, you will most likely look for other lenses to suit your needs. Here we will touch on buying the right lenses to ease your transition from stock lens to various zooms and primes, as well as the switch from crop sensors to full frame.

First and foremost: Be proactive.

Knowing that not all of the lenses in your brand’s line-up will fit your camera, or your future camera, is key. Look for versatility. The worst thing you can do is stockpile lenses for your beginner camera, only to be lens-less when you graduate to your next body. Beyond that, consider how an 85mm lens works with a cropped sensor versus a full frame, and so forth.

But what is full frame, anyway? A full frame sensor provides the same area of exposure that the original 35mm film cameras did, and all crop factors are relative to this. If you take the same photo with the same lens on a camera with a crop factor (Canon Rebels, Nikon D3000’s) as you did on a full frame camera, you will see that the crop factor produces a photo that seems more “zoomed in.”

Crop ExamplesFor example, the Canon T4i generates an image that is 1.6x smaller than that of the Canon 5D Mark III, which is a full frame. The T4i also hosts lenses falling under the EF and EF-S categories, while the Mark III is only compatible the EF mount. Therefore, any EF-S lenses wouldn’t work once you graduated to the full frame Canon. The EF or EF-S designates the type of bayonet that will attach to your body. Forcing an EF-S onto the Mark III without an adapter could cause the mirror inside the camera to break, costing you hundreds to repair.

Understanding how the 1.6x crop (for Canons) and 1.5x crop (for Nikons) will effect the zoom on future photos taken with a full frame body will help you develop a collection of highly flexible lenses that will reduce the immediate expense of upgrading your body, and the amount of luggage when bringing your “undergraduate” camera along for back up.

Here’s a guide to equivalent lens sizes for our different crop factors:

Crop Conversions

Next, consider all the factors that play into your perfect collection.

Lenses typically outlive camera bodies by a long shot, making the high price of quality a more reasonable investment. If you’re interested in portrait photography, investing in a well-made prime may be the right move for you. Likewise, if you’re a traveler or simply looking for tremendous versatility, a great telephoto zoom, such as the Canon 24-105mm f/4 L, may be paramount.

Perhaps you want your camera to accompany you into treacherous locals. If this is the case consider what you’re up against. Weather and theft are big things to think about for the traveling photog. The signature red ring on L series lenses advertises their price tag, and they certainly aren’t worth risking in wet, rough environments if you’re budget doesn’t include incidentals.

Having a collection with a couple of professional, signature lenses and cheaper alternatives will help you pack the perfect camera bag for every occasion.

And finally: Ask questions.

Specialized camera shops tend to have a collection of lenses with bodies to test them on, and larger cities offer rentals. These stores should have willing employees boasting an in-depth knowledge of their products, unlike other big-box stores and online retailers, easing your purchase anxiety.


30 Examples of Beautiful Lomographic Photos

The lomography movement was founded in the early 90s in Austria. Since then, it has become vastly popular, developing a cult following for those wanting to give their photos a classic, vintage feel. Traditionally, Russian LOMO LC-A cameras were used to achieve this effect. As other analogue cameras were developed such as Fisheye, Colorsplash and Holga, lomography increased in popularity. Now, there is a whole range of analogue cameras available, differing in price and quality.

Lomographic photos tend to share some common characteristics. Over-saturation is one common characteristic which is used make the colours really stand out and give it a bold effect. Another common trait is blurry photography, which gives the photos their vintage feel. Usually, these traits would be associated with traditional characteristics of bad photography but using an analogue camera they can be used to create some amazing photos.

Lomographers practise a few rules to help achieve these photos. These include to always carry your lomo camera wherever you go and be prepared to shoot at a moment’s notice. The trick is not to overthink when taking these kinds of photos and just snap whatever you feel like. You don’t have to know what you have captured before you take the photo!  Some of greatest photos can be the result of an accident, when you photographed something you haven’t seen before.  You don’t have to be a professional photographer to take these lomographic photos. Both professionals and novices can achieve the same results.

All you need to get started is a cheap analogue camera, buy a roll of film (would recommend regular 35mm for beginners) and get shooting! You can experiment with various different effects, such as playing around with the exposure or adding a red-scale effect. There is no end to the amount you can do with lomography. The key is to get out there, and experiment. There are lots of groups on the internet where you can share your work and gain inspiration.

Below you can see a collection of some amazing examples of some lomographic photos. To learn more about the movement and to check out some more of the work, you can visit the official website here.


Want to create gallery quality art from your lomographic photos?  Check out Bumblejax.com for stunning photo mounting to bamboo, acrylic (including blocks) and raw aluminum.

15 Apps For Travel Photography

Summer is over, but that doesn’t mean it’s not a great time to travel!  With cooler temperatures and soon a myriad of fall colors,  I thought I’d highlight some great travel photography apps for your iPhone.  Have some of your own favorites?  Let us know in the comments section!

Instagram

1

We obviously have to include Instagram on this list. It’s the most popular photography app out there and has a wide range of filters to transform your photos with. Sharing photos is easy and you can take inspiration from others ‘instagrammers’ out there.

Outdoors GPS Great Britain with National Parks OS Maps

2

If you are an adventurous photographer who wishes to take photos from off the beaten track, this app is perfect for you. It comes with a road atlas and maps of the National Parks so you don’t get lost trying to find an amazing photo opportunity.

Rough Guide

3

Using GPS, the Rough Guide will help to track your travels. You will be able to write posts and attach photos which will only be uploaded once you have a Wi-Fi connection. You can also see what nearby photographers are uploading.

Free wifi finder

4

No one likes paying for Wi-Fi and the charges for using data abroad are usually incredibly expensive. If you are planning on using some of the apps on this list, use this Wi-Fi finder will cut down on any charges you may incur.

Google goggles

5

This app will help you to identify what you’re taking a photo of. Just snap a photo and Google will return information. You can also use the search function to find some other handy information.

Photosynth

6

With travel photography a lot of the best photographs are shot in panoramic. Photosynth will stitch your photos together seamlessly to create great panoramic shots.  It’s integrated with Facebook so you can share your photos easily.

Tripjournal

7

Tripjournal is like a digital scrapbook for you to catalogue your holiday photographs and experiences. As long as your GPS is switched on, the app will automatically geo-tag your photos and build a map of where you have been.

Insight guides

8

Designed by Insight Guides, this app will send you a daily travel photograph to give you a little inspiration every day. They also dispense lots of advice and travel tips, invaluable for those wanting to know more about travel photography.

Dropphox

9

Brought to you by the makers of Dropbox, this app wirelessly connects your iOS camera to your Dropbox account allowing you to store large amounts of photos easily.

Fotopedia Heritage — Image-based location guide

10

This app is great for gaining some inspiration before you embark on your travels. Packed with around 3,000 photos it’s a photobook of the best places in the world to photograph.

Diptic

11

Create fun collages of your images with this photography app. Perfect to show off to your friends others without having to trawl through thousands of photos.

Snapseed

12


One of the best photo editing apps out there. It contains some Photoshop plugins which is great for the more experienced photographers out there. Saves on waiting to edit until you get back to the computer.

Gps4cam

13

This app allows you to geo-tag all your photos very simply. Saves you having to buy a GPS add on and you won’t incur any data roaming charges.

Sun seeker

14

Sun Seeker allows you to pinpoint the exact position of the Sun at any time, any point in the World. This will help you to find the ‘golden hour’ of light and also increase the chances of photographing some amazing sunrises and sunsets.

Postagram

15

Using images taken with its namesake, Instagram, this app allows you to turn your photos into postcards to send to friends and family. It will send a postcard out to your address book with the photo ‘popping’ out of the card.

Some Of The World’s Most Stunning Photography Opportunities

Every year thousands of people descend upon tourist hotspots hoping to take some great photographs. But are these tourists attractions over-rated, or do they really live up to hype? Sometimes the most photogenic places can be found off the beaten track. This list will take you through some great locations for you to discover.

Machu Picchu, Peru

1

The pre-Columbian site located 8,000 ft above sea level in Peru isn’t called ‘The Lost City of the Incas’ for nothing. Reaching it may be hard, especially since restrictions have been put in place to limit the negative effects of heavy tourism, but it’s well worth the effort. Voted one of the new Seven Wonders of the World by a worldwide poll in 2007, Machu Picchu is one of the most enduring and iconic symbols of the Inca Empire.

Ölüdeniz, Turkey

2

Ölüdeniz is a picturesque town nestling on the south west coast of Turkey. Its tranquil sandy beach and twinkling azure seas make it one of the most photographed beaches in the Mediterranean – get higher up for panoramic views and magical shots overlooking the bay.

Angkor Wat, Cambodia

3

The former center of the capital of the Khmer Empire is a stunning temple complex that’s revered as one of the planet’s most significant architectural sites. Aim to get there for sunrise for the best shots of the east facing temples, when the light is at its very best.

Maya Bay, Thailand

4

Made famous by the 90s movie The Beach, Maya Bay is a beautiful bay ringed by steep limestone hills on the island of Koh Phi Phi. Its varied and exotic marine life makes it a huge draw for diving enthusiasts. If you’re lucky enough to have an underwater lens there are magical shots lurking beneath those tranquil turquoise waves.

New York

5

In the city that never sleeps the photo opportunities are almost endless. But still it’s the Empire State Building that most people want for their perfect shot. Once you’ve got the standard front-facing shot of the monument in the bag, head 16 blocks north to Rockefeller Centre and its 70-floor high Top of the Rock Observation Deck. That’s the spot for the best view of the Empire State Building, plus magical panoramas of the entire city.

Barcelona, Spain

6

Barcelona is filled with amazing architecture which is a delight to photograph. Sagrada Familia, Gaudi’s unfinished masterpiece is impossible to capture in a single frame. Instead focus on detailed shots of the carvings, stained glass and steeples.

Queenstown, New Zealand

7

For those who love to photograph, the mountains and lakes of Queenstown is a must. Visit in the winter for glistening snow-capped mountains, and in the summer for the gorgeous sunsets over Lake Wakatipu.

Venice, Italy

8


Always popular with travel photographers, Venice has to be included on this list. With its pigeons, people, carvings and imposing arches, Piazza San Marco is one of Venice’s most photographed sites. The main square is never quiet, so try to arrive at first light or dusk to avoid jostling for space with the other camera-w ielding visitors.

What are some of your favorite places to photograph?  Let us know in the comments!

If you’d like to create gallery quality wall art from your travel photos using bamboo, acrylic or aluminum check out Bumblejax and bring those photos to life!


How To Create Light Writing

Light writing is a form of stop motion animation and is created by capturing various still images and placing them together. The technique has become increasingly popular in recent years. Its use in television adverts had seen a huge increase in its popularity and usage. It is a really creative way to share and send a personal message.  It’s simple and easy to do and in this article we show you how you can carry out this effect.

You will need a digital camera with an adjustable exposer to create light writing. You will need to be in a dark area to carry this technique. You can either use your room and turn the lights off, or be outside at night. To show some background in your photos you can use street lighting, or illuminate some objects in the background, such as trees.

Place your camera around 10-15 feet away from where you will be writing. Use a tripod to keep the camera steady. Check that your picture will be in focus first using the regular shutter speed. If you are happy with the focus and the angle then set your shutter speed to around 20 seconds or longer. This will depend on how much you have to write and how quickly you can do it.  F-stop will need to be set at around 5.6. Put the shutter on timer for however long it takes to walk 10 to 15 feet away.

Then grab your light source and start writing! The most common source for light writing is a flash-light, although you can use pretty much any light source. Using LED flashlight will give your photos a colourful look or you could use glow-sticks for a cheaper alternative.

Go quickly to get the best effect. Try not to shine the light source directly at the camera as this may create a blur in your photos. To start a new line simply turn off your flash-light until you get to where you want to start again. If you’re using a different light source, just cover it up with your hand. Make sure not to turn on your lights until your camera has stopped shooting as this will ruin your photos.

Although this technique is really simple to carry out it may take some experimentation to get the perfect shot. You can experiment using different settings in your camera as well as different light sources.  Have fun!

Check out some great examples below:


Digital Photography Tips, Tricks & Reviews